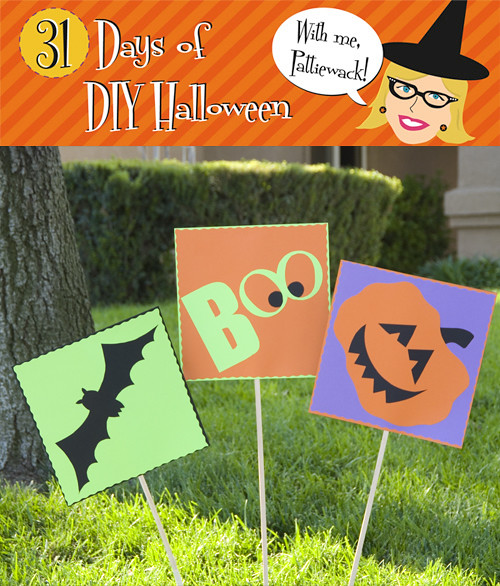
Who doesn’t love a little yard art? These are perfect to point the way to the party and they are super easy to make. Just poke them anywhere, like down the driveway, or in potted plants. And if you store them flat, you can use them year after year.
Materials
– Aleene’s® Crystal Clear Tacky Spray™
– Pencil
– Scissors: straight edge and wavy edge
– Newspaper or large plastic
– Easy release tape
– Cardstock: 12” squares 3 orange, 3 lime, 5 black, 1 Violet
– Paper
– Balsa, 3 strips 3/16”
– Patterns (click here for patterns)
Instructions:1. Enlarge patterns to fill most of a 12” square of cardstock. Cut shapes out and tape to appropriate cardstock. Bat, pumpkin mouth, stem and eyes and circles on black. Use orange for pumpkin and lime for Boo letters. Cut shapes out.
2. To protect work area, place newspaper or plastic on a level surface and use this area for all spraying of glue.
3. Lay letters BOO and black circles on newspaper and spray back with Tacky Spray. Quickly pick up pieces and place on orange cardstock. Refer to photo for placement. Trim edge of orange cardstock with wavy edge scissors. Spray back and place on full sheet of lime cardstock.
4. Repeat spray instructions with eyes, mouth and stem on pumpkin. Attach this unit to violet cardstock. Trim edge with wavy scissors and attach this unit to full sheet of orange cardstock.
5. Spray back of bat and attach to lime and trim edge with wavy scissors and attach to black cardstock.
6. Working quickly, spray back of a piece of black, lay on a clean work surface and lay one balsa stick in center about 3” down from the top of cardstock. Spray back of one layered design units with wavy edge and place on top of stick, centered on black cardstock. Firmly press papers together with hands.
7. Repeat with other two designs.
Craft on! Click here for today's daily giveaway!
No comments:
Post a Comment